Showing posts with label Craft Corner. Show all posts

Friday, April 20, 2012

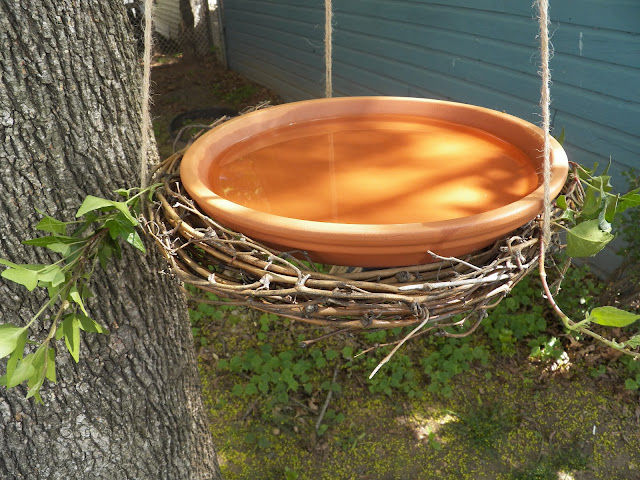
Easy Grapevine Wreath Birdbath

Here's an easy, inexpensive bird bath for our little feathered friends.  Use a grapevine wreath and a flowerpot saucer to create a refreshing spot for the birds. 

All you need is:

  • 3/8" manila rope (I used jute)
  • 15-inch grapevine wreath
  • 10-inch terra cotta saucer
  • Grape leaves or ivy
Instructions:
  1. Cut three (5-foot) lengths of rope and knot them together at both ends.  Nestle the wreath inside the ropes.
  2. Place the saucer inside the wreath.  If you like tuck in ivy or grape leaves and wind them around the ropes.
  3. Use more rope for hanging the bird bath if needed.
This a perfect project to do with your kids who think that bathing is for the birds!!

Thursday, December 15, 2011

White Chocolate Hot Cocoa Cones - Stocking Stuffers!

This is a quick, yummy little stocking stuffer that can also be given to teachers, the mailman, anyone that you might have forgotten at Christmas time. 

You will need:
  • 2 disposable cake decorating bags
  • 1/2 cup instant Hot Cocoa mix
  • 1/4 cup white chocolate chips
  • 1/4 cup mini marshmallows
  • Candy cane or small ornament
  • Chenille stem or ribbon

Directions:
1. Package hot chocolate mix. To make it easier to fill and package cone bags, insert them inside a tall, narrow drinking glass, votive or vase. Fold the cuff of the bag down over the lip of the glass, and add hot cocoa mix to the bag.
Remove cone bag containing hot chocolate mix, and secure with twist tie. This bag will be placed inside the second bag to hold the hot chocolate mix securely. Trim ends of bag to 1 inch.


2. Package candy treats and marshmallows. Place the second cone bag inside the glass, and fold down the top around the glass rim.
Place the sealed bag of hot chocolate mix inside the second bag, then layer chocolate chips over the top, followed by marshmallows.

3. Secure cone and decorate. Remove the filled bag from the glass, and use the chenille stem to secure the cone around the contents.  Add a candy cane (for stirring to add peppermint flavor to the hot cocoa) or a cute little ornament.
Each packet of will make approximately 4 8-ounce cups of hot chocolate.  The white chocolate will melt into the cocoa making an instant mix something special!

On a Christmas gift tag, add directions:
For a warming winter drink, add 2 Tablespoons
cocoa mix to 8 ounces hot water or hot milk;
garnish as desired, stir with the candy cane,
sip and enjoy!
~Adapted from Organized Home


Lamb Around

Sunday, November 13, 2011

Craft Corner - Tube Cowl Neck Scarf

I love giving handmade gifts for Christmas every year.  I came across this pattern for a scarf that you don't have to tie, just slip it over and scrunch into your desired look!  My lovely niece did the modeling for me.!

I have gotten such a great response from those who I have given these to, that I decided to make these available on line!

A soft, warm blend of Lamb's Wood and easy-care Acrylic.
Machine Washable and Dryable.

These are available from me at Etsy.com

Available Colors:

Apricot

Blossom (shown above)

Barley (Rich chocolate brown with strands of cream)

Claret (Deep purplish Red)

Cranberry

Eggplant

Oatmeal 

Etsy.com is a great place to buy and sell unique gifts.

If anyone is interested just stop by my "shop"!

I have met so many great friends this year!
To celebrate 1 Year of Comfy Cuisine and almost
500 Facebook Fans, I wanted to giveaway a Thank You Handmade Gift from me!
To enter:
Leave a comment below
Post this Giveaway on your Facebook wall
If your on Twitter - Tweet it!


Pin It

Saturday, October 15, 2011

Spooky Sparkle Pumpkin - Quick & Easy Pumpkin Decorating

Halloween has always been my favorite holiday.  Every year I try to come up with some new ways to decorate.
I have been on the look-out for some Cinderella Pumpkins, but I have not had much luck.

Here is a little white pumpkin I found and just added some copper ribbon and some burgundy and plum accents.
I think it's too pretty to leave outside...

The next pumpkin has a copper finish with some Spooky Sparkles!
When I taught pre-school I would sprinkle this "magic dust" on the kids to keep the monsters away on Halloween!
It works for 3-year olds.

Take your pumpkin and tape up the stem.
This pizza box came in handy.

Spray the pumpkin lightly with metallic spray paint.
I used Rust-oleum Aged Copper
Sprinkle with Spooky Sparkles
I think this pumpkin looks pretty just as it is, but you can add the copper ribbon.

Click on the link below to make these cute pumpkins!


Lamb Around Linky Alert! 
Fun Halloween Recipes and Crafts - Cookin Canuck 

Thursday, August 4, 2011

Make some Dough! - Play Dough that is.....

Home made play dough is easy to make, easy to store and fun to use.  When I was a teacher at the YMCA, I had a class of 2-1/2 year olds.  As most teachers know, you usually have to spend your own money for supplies for your classroom.  I would make this play dough for them.  Working and rolling this dough is very relaxing for children.  This was one of their favorite things to play with and keeps them busy for at least an hour!

This dough is safe if some finds its way into the sculptor's mouth.  I've had to remove it from a few kids ears!  The dough contains alot of salt, so if they do want to try a piece, I don't think they will come back for more.

You can roll it out into slabs with a rolling pin or pat it flat with your hands so you can use it for building material or for cutting out shapes with cookie cutters or plastic knives.  You can make animals, people, "hot dogs", snakes - just let the kids use their imagination!  It's a big part of their development!

  • 2 cups all-purpose flour
  • 1 cup salt
  • 1 Tbsp. alum or cream of tartar (optional, but helps preserve the play dough)
  • 1 Tbsp. vegetable oil
  • 2 cups boiling water
Food coloring (optional)            


Mix the flour, salt and alum or cream of tartar together.  Add the oil, water and coloring if you plant to make just one color.


Knead for 6 to 8 minutes.  If you want more colors, divide the dough after kneading for 3 or 4 minutes, add a different color to each piece and finish kneading each separately.  (This is a good job for the kids.)
Refrigerate until ready to play again!

If you would like to make a dough that can be "fired" like clay to make permanent sculptures,

3/4 cup boiling water
1/2 cup salt
2 cup all-purpose flour
Food coloring (optional)

Pour the boiling water into a medium-sized mixing bowl.  Add and dissolve the salt.  If you want the dough to be all one color, add color to the water.  Stir to cool a bit and then add the flour all at once.  Mix and shape into a ball.  Knead for 6 to 8 minutes.   To make more than one color divide as in above recipe.

Preheat your oven to 225 degrees F.  Lay the shapes on foil-covered baking sheets and bake for 30 to 90 minutes depending on thickness.  Cool completely before painting.

If you plan to hang the dough creations, before you bake them make a hole in the top of the piece or shape the dough so that a string can be tied around it.
 You can paint these with acrylics, poster paint for water color.
Use felt tip markers for detailing.
After painting bake once more in a warm oven 200F for 30 minutes.
Have some fun with your kids!
 My mom made this for me when I was growing up - so you are going to make some memories for your kids and have lots of fun doing so!  This is a great summer afternoon project.  Sit down with your kids at the table and just take some time to play!
Parents:  I have a full year's curriculum of ideas and crafts for Toddlers that I am no longer using. If you are interested in a monthly newsletter, please contact me.  I'd be happy to send them to you!
Artisan Cast Iron Dutch Oven Bread

This recipe is a typical one with two rising periods.  Most of this time it's the yeast working and not you! 2 cups water 1...